How it works
VibeKey is three mechanical keys wired to an ESP32. The board connects to your computer, phone or tablet as a Bluetooth keyboard, so there are no drivers to install.
Each key sends whatever you assign to it, such as mute, volume, push-to-talk or a multi-key macro. Your mappings are saved on the board, so they stay with it when you switch devices. Changing a mapping doesn't require reflashing the firmware.
The build takes about 2 to 4 hours and costs about $18.
What you need
- ESP32-S3 DevKitC-1, about $8 to $10
- 3 MX-compatible key switches and keycaps, about $5 to $6
- A USB-C cable
- 6 short wires, 22 to 26 AWG
- Optional: an LED and a 220 ohm resistor for a status light
- Optional: a 3D printer for the case
1. Wire the switches
Each switch connects to one GPIO pin and to ground.
| Switch | Pin A to ESP32 | Pin B to ESP32 |
|---|---|---|
| Button 1 | GPIO 4 | GND |
| Button 2 | GPIO 5 | GND |
| Button 3 | GPIO 6 | GND |
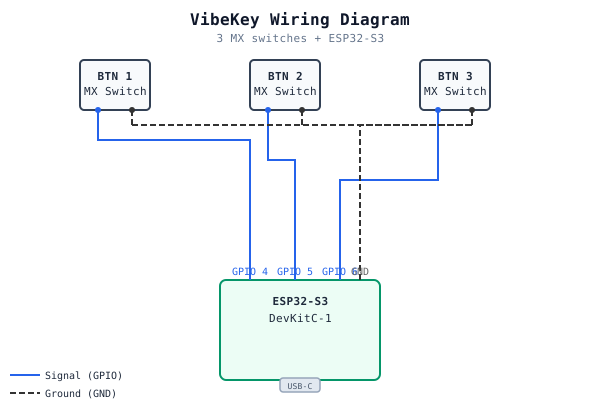
./vibekey diagram.The repo's HARDWARE.md has the full assembly walkthrough, with soldering tips and LED wiring.
2. Run the setup wizard
Plug in the board, get the code and start the wizard:
git clone https://github.com/hpriehle/vibekey.git
cd vibekey
./vibekey setup
The wizard installs PlatformIO and pyserial, configures your pins and Bluetooth name, and flashes the firmware. It then helps you pair over Bluetooth and map your three buttons.
3. Change your keys
You can remap at any time without reflashing:
./vibekey map                 # interactive menu
./vibekey map mute f13 space  # set all three at once
./vibekey map --get           # show current mappings
./vibekey keys                # list every key name
For combos, assign a macro to a button. Separate the steps with spaces, and use 0 for a pause:
./vibekey macro 1 left_ctrl+c
./vibekey macro 3 left_ctrl+a 0 left_ctrl+c
The board stores three profiles, which you switch with ./vibekey profile 1. You can also hold buttons 1 and 3 during boot to cycle through them.
4. Print the case
The case holds the three switches side by side, with the board underneath. Generating the STL files requires OpenSCAD:
cd case && make
Print with a 0.2mm layer height and 20% infill in PLA or PETG. It doesn't need supports.
If something goes wrong
| Problem | What to do |
|---|---|
| VibeKey doesn't appear in Bluetooth | Run ./vibekey monitor to check the firmware output, then reset the board. |
| A press isn't detected | Check the wiring, then watch ./vibekey monitor while you press the key. |
| The computer doesn't receive the keystroke | Remove the Bluetooth pairing and pair again. |
| One press registers twice | Raise DEBOUNCE_MS in firmware/config.h to 80 to 100, then reflash. |
| The serial port isn't found | Run ./vibekey ports, then pass the port with -p. |
| The upload fails | Hold the BOOT button on the board while it uploads. |